
Specifications
Engine: Unreal Engine 4.27
Perspective: First Person
Gameplay: Single player, linear level/mission type
Inspiration: Half-Life 2, Wolfenstein: The New Order
Time frame: 6 weeks half-time, i.e. 4 hrs/day
Intent
I wanted to create a level about infiltrating a chemical weapons facility. It should have short branching paths and optional collectibles without feeling confusing or slow-paced.
Combat encounters should also be varied and encourage the player to look to their surroundings to gain an advantage.

Level Flowchart


1.
2.
3.
Woods (start)
Parking lot
Maintenance area


4.
5.
6.
Rooftop
Beneath bridge
Main factory entrance


7.
8.
9.
Factory area
Storage area
Bridge


10.
11.
12.
Stairwell
Cafeteria
Office corridors


13.
14.
15.
Office
Hidden staircase area
Tower roof (end)
Tension Graph

A graph representing the level of tension in each area labeled above. Tension is determined by the amount of enemies in the area and their proximity to one another, and the amount of play time without combat before and after the area in question. For example, notice that the tension after the cafeteria (11) doesn't drop to the base level. This is because there is only a short elevator ride between the cafeteria and the office area, and so there's not a lot of time for the player to catch their breath between encountering the enemies in those two areas.
Design Decisions
1. Woods

The sewer pipe is a common level entrance in my reference games, but this intro section was made with the intention of being able to connect to any type of level preceding it. The important part is that the approach feels sneaky, as opposed to the player simply walking through the main entrance.

The radio tower (left) and the background skyline (middle), partially visible behind the trees for a slow reveal.
2. Parking Lot

The view of the parking lot as the player emerges from the woods.

An entrance to an alternate route is partially hidden behind a car and a few barrels. The platform by the door also allows the player to view the upcoming rooftop area, in an example of foreshadowing.

The loading bay is made into the main point of interest with the help of a light beyond the open door and the pattern of black and bright yellow on the height clearance warning strip.

A closed gate blocks the road out of the parking lot, but allows the player to see a glimpse of the main entrance area (circled) as well as some background buildings to give the illusion that the world extends beyond the borders of the playable area.
3. Maintenance Area

The first enemy is facing away from the player. The room is also full of tanks, and there's a lower area visible through gaps beneath the platforms. This teaches the player three things: 1: Enemies can't spot you from behind them. 2: Objects can break line of sight, and 3: There are often multiple paths, and some are safer than others.

A
B
C
The ledge to the left (A) suggests to the player that they can move behind the tanks. The gaps (B) provide a peek into the area below, and the light in the doorway (C) is a different color to draw attention to the path forward.

Between the loading bay an the maintenance area is a short hallway with a dark doorway providing some tension as well as preventing the player from seeing the enemies from outside.

The area below the maintenance area (the "maintenance area maintenance area"?) allows the player to take potshots at the enemies above (circled on the right). There is also an easily noticed collectible placed here (circled on the left) to reward the player for seeking out an optional path.
4. Rooftop

When considering the purpose of the level within the imagined game it would be part of, I decided that it would serve as the introduction to a new enemy type: a flying drone robot, which is manufactured at the facility and would also be the first non-human enemy the player would face.

The initial view of the encounter. In terms of image composition, most lines and edges in this shot (especially the pipe) serve as leading lines, pointing at and drawing attention to the tinkering enemy. The rule of thirds is also employed to create an interesting view as the player first steps onto the rooftop.

The white lines represent the main paths the player is able to take during the encounter. There are tanks of various heights for the player to hide behind and loop around, as well as the staircase, which covers the player from above; a helpful spot when facing a flying enemy. The red skulls indicate enemies.

Two more drones are waiting to surprise the player as they're approaching the staircase. The boxes serve as both cover and instances of environmental storytelling, as the drones have been in development until only recently, and are being tested and demonstrated before being sold, packaged and shipped off.
5. Beneath the Bridge

When descending the stairs, the player is placed at eye level with the bridge, which is one of the major landmarks in the level, along with the tower, which is also not shown in full view before this section. The purpose of this area is mainly to break the tension and help the player familiarize themselves with the layout of the facility.

The staircase to the left is actually the quicker and safer path forward, but here it is partially obscured by a pair of support pillars. The idea is that the player will likely go to the right and end up on the road and be presented with the view shown below:

Some additional foreshadowing for the curious player. They don't need to go to this corner, but if they do they'll see a glimpse of the upcoming stairwell, cafeteria and even the open window on the top floor. Additionally, this "non-space" between two buildings makes the area feel more like a real-world place.

Here, at the same time as when the enemies come into view, the player will also notice multiple paths and points of cover below, if they did not see them earlier. Now the player can choose to bravely (or foolishly) rush up the road, or jump over the railing into the grove of trees below for more of a stealthy experience.
6. Main Entrance
The service tunnels connect in this staircase area, allowing the player to enter at two points. This makes it a good section for hiding and surprising enemies for players who prefer to play safely, and thus they will also be rewarded by noticing the doorway into the basement area.

These crates and barrels are placed in a clear staircase formation when approached from the road, but this is less obvious from the other side of the truck (which also hides a collectible).

The basement area exposes the foundation of the building itself. This makes the building feel more believable, but the main point of these different paths is to allow the player to choose their approach to the next big combat encounter: from the front, from above, or in this case, from behind.

1
2
3
4
The section has four tiers, allowing the player to either get the high ground by climbing onto the truck or the roof beyond, or find spots below the enemies' line of sight. This is reinforced by making tiers one and two connect underground, and hints at this strategy being useful in the upcoming section.
7. Factory Floor

1
2
3
The layout of this space was heavily simplified throughout each iteration, but the core concept remains: putting the player on edge by placing enemies directly above them, forcing them to look up, similar to a mouse scurrying to safety beneath floor boards. They are give three different points of entry however, as shown above.

The view from the main doorway shows the player a few enemies on the catwalks, the stairs leading up to them, and the path forward indicated by a different color light. The rest of the room is mostly obscured by machines in order to put the player on edge as they sprint across the open floor to the safety beneath the catwalks.

The maintenance hatch leading up from the basement area is hidden below the staircase, allowing the player to enter the room completely undetected instead of sprinting across the floor to the stairs on the other side.

The second floor entrance leads to a balcony that is relatively exposed, but also allows for a good view of the whole room. From here the player can play aggressively by jumping across the gap or jump down to hide below, with the benefit of having seen where all the enemies are.
8. Storage area

A relatively straightforward corridor, but with a narrow channel with pipes in the middle. Here the player can see the feet of patrolling enemies in the next room and find a collectible if they jump down and turn around. Also one of many other examples of pipes being used as leading lines.

On the left are low windows to a previous corridor in the maintenance area. To the right is the opening from the pipe channel, which is both a point of no return preventing the player from getting back up, but also a chokepoint allowing the player to take out the enemies in the room relatively safely, one by one.

In this room the contrast between the natural sky light and the dim lightbulb in the obscured low doorway creates an air of mystery and suspense in this slower paced, lower tension area. In the engine, there is a wide rectangular light below the ceiling as the skylight windows don't really provide much light at all.

A typical example of a bait and switch. The boxes on the left conceal the doorway from this angle, with the light on the right leading the player in that direction (where they'll find a collectible). After turning back around they will realize there was a doorway there all along.
9. Bridge

The large amount of symmetry and repetition in the composition here, along with the sickly greenish light and the fact that the player has already seen the bridge from outside, is intended to build suspense. More experienced players might even think that they're approaching a boss encounter, which is not too far from the truth.

To the right of the bridge the player can see the staircase they descended earlier, after first encountering the drones. Ideally, the player has been very curious about the bridge since that moment.

At the far end of the bridge there are potted plants, warm lights, wooden walls and a shiny metal doorway with a neon light fixture. This communicates to the player that they are clearly not in the industrial section of the facility anymore.

And to the left is a view of the road and the main gate. Passing beneath a bridge of this kind in a similar area is what first inspired me to make this level.
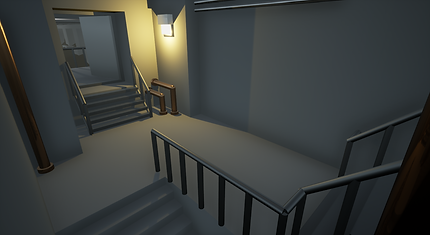
10. Stairwell

The first view of the stairwell is a scenic moment. The enemy is turned away to allow the player to take in the image. This clean and modern area is meant to evoke the type of hi-tech, luxorious office building that you would see in something like a heist movie.

This gap creates an interesting vertical combat space where the player can spot and be spotted by enemies several floors below, as well as take cover by moving both up or down and left or right. In a sense, this symbolizes the player gaining the upper hand as this is a reversal of the situation in the main factory area earlier.
11. Cafeteria

A classic enemy preview. Placing the drones by the large window and using the angle of the cafeteria structure helps draw attention to the stage.

Tables and chairs have been flipped and stacked to make room for the stage, providing good cover for the player, as well as letting them reach a hidden collectible on top of the cafeteria structure and drop down a hatch into the kitchen as an example of a short vertical loop with a minor one-way drop.

The guards are in the process of setting up the drones and so one of them is still in its box and not visible from the entrance, surprising the player. The scattered boxes, speakers and drinks being set out for an upcoming marketing event is also an example of environmental storytelling.

This unassuming door has been left ajar...

A pair of guards are setting up (or prematurely helping themselves to) the drinks. The player can jump the counter to reach more cover behind upturned tables. This also causes the stacked glasses to go flying, which is a fun detail. Additionally, take notice of the hatch in the ceiling, through which the player can get the jump on an enemy.

... leading to an equally unassuming storage room...

The small structure outside of the playing area serves as a point of interest along with the pipe being used as another leading line to draw attention in case the player doesn't realize that the path forward is around the corner to the left. The light above serves this same purpose.

...providing another, safer path into the kitchen. Notice the pipes and equipment being angled to create leading lines drawing attention to the main combat area to the right.
12. Office Floor

This elevator leads up to the office floor. The window and the light above serve to add some interest, to make sure the player doesn't mistake this small door in the corner for an optional side path.

A side door leads out onto the cafeteria rooftop. Sections that require the player to climb narrow ledges not meant for traversal really help making the player feel sneaky and clever, but they are easily missable. In this case the player can see the entire section through the window even if they initially do not notice it.

The entrance to the office floor has three pathways, but the central one is clearly indicated by lights and windows. The player can also see the open window to their destination across the rooftop outside. As the penultimate section, it shouldn't be too sprawling/disorienting, but still fit the theme/feel of the level.

In the rooftop garden the player has to fight (or sneak past) more drones, but they are rewarded by being able to see into each office without having to enter it.

The office area is more colorful and orderly arranged/furnished, in stark contrast to the factory area which is still visible through the windows. Naturally, the office the player needs to find is the last one down the corridor.

The other offices are empty and sparsely decorated, to build suspense each time the player opens a door without making them feel like they need to search each corner for secrets. Of course, thorough players are rewarded with an easter egg, which is easily and naturally placed in an office environment.
13. Office

In an example of visual storytelling, this office has obviously been searched already and the MacGuffin is missing. In case this isn't clear, the remaining guard still actively searching the room is sure to get the player's attention. Unless, of course, they're coming through the window behind him.

As seen from here, the hidden door in the office is a case of bait and switch if entered through the main door. When approached from the window, the hidden door is clearly visible. Additionally, the player is given a free shot at the unsuspecting guard.
14. Hidden staircase area

In the hidden storage area, the dim lighting and steel bars convey a sense of foreboding, and of being trapped. This is echoed in the following sequence as the player is being pursued and cannot go back and explore, making this the final point of no return.

The red lights along the looming staircase next to a chaotic pile of boxes signals to the player that they shouldn't dally here. In terms of the plot, the plan has changed and the player needs to get out fast. Again, the player needs to look both up and down the stairs and platforms to avoid enemies, just like earlier in the level.

This maze of boxed drones under dim red lights is meant to be mildly disorienting, but in reality it is a very linear path, and the player is given ample opportunity to spot the drones through gaps and around corners, The guards also move very slowly up the stairs, as an element of urgency more so than an additional challenge.

To keep the player on their toes, the penultimate floor is blocked off by toppled boxes. However, the nearby service elevator is brightly lit and boxes are placed to make it clear that they can be climbed. For a very brief moment while climbing, the player is exposed to enemies on all floors below, a suitable final challenge.
15. Tower roof (end)

The view right outside the door leading up to the rooftop. A final look at the city below, inspired by the common action movie trope where the music pauses for a brief moment while the protagonist readies up for the ultimate decisive blow.

Conveniently, the helicopter has just arrived when the player reaches the top (one early idea involved an extended fight against approaching drones while waiting, but in the end it felt more tedious than exciting). You can almost hear Arnold shouting his iconic line.
Making the Level
Pre-Production
After deciding on the type of level I wanted to make, I begun by coming up with and sketching some interesting scenarios I wanted to include, taking into consideration where in my imagined game the level would take place. I decided that the level would serve as the introduction to a flying robot enemy, placing the level relatively early in the game, at the point where the difficulty first starts to increase and the player is made aware that they won't just be facing humanoid enemies throughout the game, but other kinds as well.
Next, I drew a few different variations of a basic top-down overview, planning out the different areas and combat encounters I wanted to create and seeing how they would fit together.

A rough overview of the first half of the level.

Miscellaneous sketches for various gameplay elements and areas.
Blockout Stage
I put together some basic enemies and behaviours for them using the visual scripting system in Unreal Engine, blueprints. Then, I begun blocking out the first few combat areas and the paths between them. When I had a "first draft" of the whole level, I started adding some details, such as flat color materials to represent the different surfaces, and lights. I also began adding larger props like shelves, boxes, barrels and tables, not only because their size and shape would be relevant to the gameplay in terms of cover and blocking sight lines, but also because they would establish a sense of scale in the environment.

The maintenance area beyond the side loading bay

The main factory area

The truck, which was originally placed beneath the bridge

The second iteration of the initial drone encounter

One advantage of placing the main points of interest before anything else is shown here. When building the main factory hall I realized that the space allowed for tall windows that would perfectly frame the end point of the level just as the player ascended a specific set of stairs.

Early view from the parking lot. The balcony area on the right had an interesting figure eight loop in this stage of development, but being able to sneak past the drones by using the catwalk made it seem like the player possibly wasn't meant to fight them at all, which would've made later sections confusing.
At this point I noticed that the scale and layout of the level wasn't satisfying; every area felt cramped and the buildings felt very blocky and awkward, making the view in each area feel artificial and restricted. I decided to create a second draft of the level layout, copying over the elements and parts of areas that I liked and didn't feel like they needed to be remade.
This time I started out by planning out the whole space more carefully. Specifically, I used a piece of advice given by Peter Field in this Devolver Digital talk from 2020. He mentions starting out a level blockout by creating a landscape and placing the start and end point, allowing him to both create interesting vistas along the way and to have an organic foundation that allows you to shape the buildings in the level in a natural, believable way.

The second blockout iteration from above

The cafeteria originally had windows on both sides, which did make for an interesting room, but felt unnatural and didn't leave much room for surrounding areas. I also realized that players would be looking at the windows first, so I wanted to place the stage and the drones where the player would notice them right away.

The road approaching the facility was originally planned to be part of the backdrop, but in the second blockout it was integrated into the level, adding both a scenic view and some gamplay variation.


The office building, in three different stages. On top is the first iteration of the blockout. The middle is halfway through the second blockout stage, and below is the final version. In my opinion, the second version is both more dramatic and interesting, and also feels more believable in terms of scale and placement.
Polishing
Finally I started adding details such as trims, more blockout props and material variations, as well as more detailed lighting. While I wanted to focus on the layout and keep this project in a blockout stage, I did receive feedback that such details would help make the areas less abstract, the factory environments especially, and I agree with that. In the end, I think I managed to establish a good level of refinement where I could have smaller objects represented by mainly cylinders, boxes and spheres in order to convey what type of room they were in, without taking too much of my time away from the main work.

Pipes and various machines and electrical boxes helped guide the player as well as establishing what type of area the player was in; rooms such as the cafeteria and bridge were made more decidedly non-industrial in comparison.

Coffee machines, potted plants and polished tables. Right away the player is made aware that they are in an office area as opposed to the factory, even though all props are really just assemblages of various primitive shapes with single-color materials.
Conclusion
In the end I think this level turned out very well. I am especially happy with how I managed to create a well-paced journey with both intense action sequences and slower paced moments of sneaking around and finding hidden areas, while keeping the intended path relatively straightforward and even managing to fit it all into a three act structure with ramping tension.
I was also able to build a very believable space and lead the player through many different types of areas, both indoors and outdoors, from cramped hallways, tunnels and maintenance/storage areas to rooftops and spacious rooms covering several floors, and still making each location distinct and easy to place on one's mental map.
The most important thing I learned is really something I already knew: there's no right or wrong way to build a level, but there are good and less good ways to approach each step. When making my second version of the basic layout, it really helped to keep each area as simple as possible so that I could move them around quickly and position them in ways that created interesting angles and paths.
Of course, when an entire section of a building is represented by a single cube it's very difficult to envision how the player will navigate on the inside of that cube, so all methods definitely have both benefits and drawbacks.
It was also sometimes challenging to test out each combat area as my focus on this project wasn't scripting, and so the enemies I created had fairly rudimentary behaviors and weren't able to use their surroundings to their advantage in the way that I ideally would've liked. In hindsight I've realized that there are probably a good amount of free gameplay assets available that I could've used for things like enemy AI, weapons and movement, but at the time I decided that finding and learning to use such tools would've likely been a poor use of my time.
All in all it was a lot of fun making this level, not least because I was able to take inspiration from any games and other media that I enjoy the most, as well as locations that intrigue me. I hope you've enjoyed reading about my work!
- Bo Steen